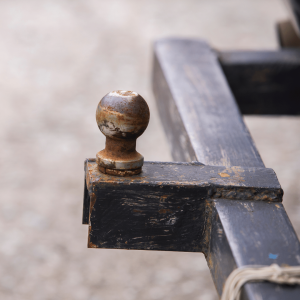
How to Remove Rust From Your Trailer: A Step-by-Step Guide
Rust is the nemesis of metal surfaces, and when it comes to trailers, it can not only compromise the appearance but also weaken the structural integrity over time. Whether you use your trailer for hauling goods or recreational purposes, keeping it rust-free is essential for its longevity and performance. In this guide, our experts at Merica Cargo Trailers will walk you through a step-by-step process on how to remove rust from your trailer and restore its shine and durability.
Step 1: Safety First
Before you dive into rust removal, ensure your safety by wearing appropriate protective gear, such as gloves, safety goggles, and a mask. Rust particles can be harmful if they come into contact with your skin or are inhaled.
Step 2: Gather Your Supplies
To effectively remove rust from your trailer, you’ll need the following supplies:
- Wire brush or steel wool
- Sandpaper (medium to fine grit)
- Rust converter or rust remover solution
- Primer
- Paint (matching the trailer’s color)
- Paintbrushes or rollers
- Clean clothe or rags
- Water and soap (for cleaning)
Step 3: Cleaning the Surface
Begin by cleaning the trailer’s surface using water and soap. Remove any dirt, grease, or debris that might interfere with the rust removal process. Allow the surface to dry completely before moving on to the next step.
Step 4: Mechanical Rust Removal
Use a wire brush or steel wool to vigorously scrub the rusted areas. This mechanical action helps to loosen and remove the surface rust. Be thorough in your approach, ensuring you cover all affected areas. For larger rusted patches, you can also use medium to fine grit sandpaper to smoothen the surface.
Step 5: Rust Converter Application
Apply a rust converter solution to the cleaned and prepped surface. Rust converters work by chemically converting rust into a stable compound that can be painted over. Follow the manufacturer’s instructions on application and drying times. Typically, you’ll need to wait for the rust converter to dry completely.
Step 6: Priming the Surface
Once the rust converter has dried, apply a layer of primer to the treated areas. Priming prepares the surface for paint application and enhances paint adhesion. Allow the primer to dry as per the manufacturer’s recommendations.
Step 7: Painting
After the primer has dried, it’s time to apply paint that matches your trailer’s color. Use a paintbrush or roller to ensure an even and smooth application. Apply multiple thin coats rather than a single thick coat to prevent drips and achieve a professional finish. Allow each coat to dry before applying the next one.
Step 8: Finishing Touches
Once the final coat of paint has dried, inspect the trailer’s surface for any uneven areas or imperfections. If necessary, lightly sand the painted surface and apply an additional coat of paint.
Step 9: Regular Maintenance
Prevention is the best defense against rust. Regularly inspect your trailer for signs of rust formation, especially in areas prone to moisture or road salt exposure. Consider applying a protective coating or wax to the trailer’s surface to create a barrier against rust.
Conclusion:
Removing rust from your trailer might seem like a daunting task, but with the right tools and a systematic approach, it’s entirely achievable. By following this step-by-step guide, you can effectively eliminate rust, restore your trailer’s appearance, and ensure its continued functionality for years to come. Remember, consistent maintenance and timely rust prevention measures are key to keeping your trailer in top shape. For more information contact the Georgia DOT.
